Maven and Spring 3 Example

I have installed JDK, Maven, and STS before starting this project. Please refer below links to know how to install these technologies.
  1. How to install JDK.
  2. How to install Maven.
  3. How to install STS.
This tutorial shows you how to create a simple project in Spring 3 using Maven.
  1. First generate a project structure using Maven. Type below code in command prompt. Here name of my project is bsnl. You can give any name as you wish in DartifactId. If you are trying to create the project first time in maven, then it will take more time because maven will take time to download the set up.
    mvn archetype:generate -DgroupId=com.bsnl.core -DartifactId=bsnl -DarchetypeArtifactId=maven-archetype-quickstart -DinteractiveMode=false
    Then this project will be created in a folder where command prompt is pointed. In my case it is D:/bsnlapp. Thus it created the project structure successfully.
  2. Then Import this project to STS. Open STS and go to File -> Import -> Maven -> Existing Maven Projects. Then select your maven project which is created in first step. Thus I have Imported my project successfully.
  3. Then update pom.xml file.
    <project xmlns="http://maven.apache.org/POM/4.0.0" xmlns:xsi="http://www.w3.org/2001/XMLSchema-instance"
      xsi:schemaLocation="http://maven.apache.org/POM/4.0.0 http://maven.apache.org/maven-v4_0_0.xsd">
      <modelVersion>4.0.0</modelVersion>
      <groupId>com.bsnl.core</groupId>
      <artifactId>bsnl</artifactId>
      <packaging>jar</packaging>
      <version>1.0-SNAPSHOT</version>
      <name>bsnl</name>
      <url>http://maven.apache.org</url>
      <properties>
    <spring.version>3.0.5.RELEASE</spring.version>
    </properties>

      <dependencies>
        <dependency>
          <groupId>junit</groupId>
          <artifactId>junit</artifactId>
          <version>3.8.1</version>
          <scope>test</scope>
        </dependency>
     
        <!-- Spring 3 dependencies -->
    <dependency>
    <groupId>org.springframework</groupId>
    <artifactId>spring-core</artifactId>
    <version>${spring.version}</version>
    </dependency>

    <dependency>
    <groupId>org.springframework</groupId>
    <artifactId>spring-context</artifactId>
    <version>${spring.version}</version>
    </dependency>
      </dependencies>
    </project>
  4. Then add simple spring bean.
    package com.bsnl.core;

    public class AppController {
    private String name;

    public void setName(String name) {
    this.name = name;
    }

    public void printHello() {
    System.out.println("Spring 3 : Hello ! " + name);
    }
    }
  5. Create a Spring configuration file, and declare all the available Spring beans. File:Spring-Module.xml
    <beans xmlns="http://www.springframework.org/schema/beans"
    xmlns:xsi="http://www.w3.org/2001/XMLSchema-instance"
    xsi:schemaLocation="http://www.springframework.org/schema/beans
    http://www.springframework.org/schema/beans/spring-beans-3.0.xsd">

    <bean id="helloBean" class="com.bsnl.core.AppController">
    <property name="name" value="Bsnl" />
    </bean>

    </beans>
  6. Update App.java
    package com.bsnl.core;

    import org.springframework.context.ApplicationContext;
    import org.springframework.context.support.ClassPathXmlApplicationContext;

    /**
     * Hello world!
     *
     */
    public class App
    {
    public static void main(String[] args) {
    ApplicationContext context = new ClassPathXmlApplicationContext(
    "Spring-Module.xml");

    AppController obj = (AppController) context.getBean("helloBean");
    obj.printHello();
    }
    }
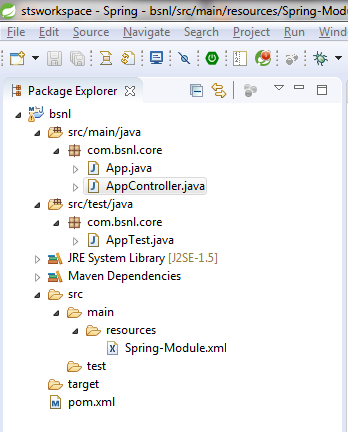
  7. Structure of this project look like this.
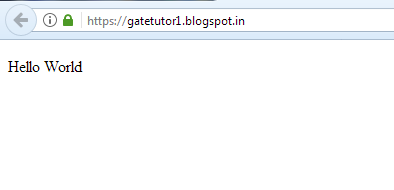
  8. Then run this project. Right click on project -> Run As -> Java Application.
  9. After this I tried to develop a web application using Maven. Please go through below link to know more about this. https://www.mkyong.com/maven/how-to-create-a-web-application-project-with-maven/

How to Install STS in Windows


  1. Download STS from https://spring.io/tools/sts/all 
  2. I have downloaded the 64bit version. Then Unzip the downloaded zip file to any folder.
  3. Then start STS by double clicking on STS exe file in the unzipped folder.
  4. Then I got an error message like.
  5. Then I checked the log file specified in error message. The log file shown error message like org.eclipse.e4.core.di.InjectionException: java.lang.NoClassDefFoundError: javax/annotation/PostConstruct. Then I got solution for this issue by searching in internet. If you are using Java 9 or 10, then you may also have same issue. To resolve this issue add --add-modules=ALL-SYSTEM in STS.ini file.
  6. Then again open STS by double clicking STS.exe file. Thus STS opened for me successfully.

How to Install Maven in Windows


  1. First, install JDK. Click here to know how to install JDK.
  2. Then visit Maven Official Site and download apache-maven-3.5.3-bin.zip.
  3. Then unzip this file to any folder.
  4. Goto Control panel -> System -> Advanced System Settings -> Environment Variables. Then add M2_HOME and MAVEN_HOME. Give value of both as the path of the unzipped folder.
  5. Then update PATH variable, append %M2_HOME%\bin in Path variable, so that you can run the Maven’s command everywhere.
  6. Then test whether your maven installation is proper by typing mvn -version in command prompt. Then I got an error as shown below.
  7. To remove this error, add JAVA_HOME. Give the path of your JDK here.
  8. Then again test whether your installation is proper by typing mvn -version in command prompt. Then I got the message as shown below. Thus I have completed the maven installation successfully.

How to install JDK in Windows.

  1. Download JDK 1.8
  2. Then install JDK by double clicking on the downloaded file.
  3. Select Development Tools and click Next.
  4. Then JDK and JRE will install in C:\Program Files\Java.
  5. Then test whether java installed properly by typing 'java -version' in command prompt. Then it's shown version correctly for me. Then again type 'javac -version'. Then I got an error like 'javac is not recognized as an internal or external command'
  6. To resolve this error, Goto Control panel -> System -> Advanced System Settings -> Environment Variables. Then select 'Path' in the System variables and click 'Edit'.
  7. Then put variable value 'C:\Program Files\Java\jdk-10.0.1\bin' after a semicolon. Do not remove any variable value which already available in Path variable.
  8. Then again test whether java installed properly by typing 'javac -version' in command prompt. Now it's shown the version correctly for me. So I have completed the JDK installation successfully.

Blogger Theme Design (Chapter 1)

This tutorial teaches you how to design a blogger template from scratch.
  1. Go to 'Theme' and 'Edit HTML' in Blogger.


  2. Now add the basic HTML code.
     <html>
         <head>
             <title>Title</title>
         </head>
         <body>
             <p>Hello World</p>
         </body>
     </html>

    By clicking Preview button, It will show an error message
    Could not load theme preview: There should be one and only one skin in the theme, and we found: 0
    Add the below code in head to avoid this error.
    <b:skin><![CDATA[
    /****CSS CODE*****/
    ]]></b:skin>
    After adding the above code it will show the error message like
    We did not find any section in your theme. A theme must have at least one b:section tag.
    Add the below code in body to avoid this error
    <b:section id="1"></b:section>
    Now the whole code will look like
    <html>
        <head>
            <title>Title</title>
            <b:skin><![CDATA[
            /****CSS CODE*****/
            ]]></b:skin>
        </head>
        <body>
    <b:section id="1"></b:section>
            <p>Hello World</p>
        </body>
    </html>
    The output of this code will be like this
  3. Add the below code in body to display all blog posts.
    <b:section class='main' id='main' showaddelement='yes'>
    <b:widget id='Blog1' locked='false' title='Blog Posts' type='Blog' version='1'/>
    </b:section>
  4. Next, I am going to add a sidebar. First add the styles of main and sidebar in the CSS.
    #main-wrapper {
    float:left;
    width:70%;
    }
    #sidebar-wrapper {
    float:right;
    width:30%;
    }
    Then use these styles for main and sidebar. Complete code is shown below.
    <?xml version="1.0" encoding="UTF-8" ?>
    <html xmlns='http://www.w3.org/1999/xhtml' xmlns:b='http://www.google.com/2005/gml/b' xmlns:data='http://www.google.com/2005/gml/data' xmlns:expr='http://www.google.com/2005/gml/expr'>
        <head>
            <title>Title</title>
            <b:skin><![CDATA[
    /****CSS CODE*****/
    #main-wrapper {
    float:left;
    width:70%;
    }
    #sidebar-wrapper {
    float:right;
    width:30%;
    }
            ]]></b:skin>
        </head>
        <body>
    <div>
    <div id='main-wrapper'>
    <b:section class='main' id='main' showaddelement='yes'>
    <b:widget id='Blog1' locked='false' title='Blog Posts' type='Blog' version='1'></b:widget>
    </b:section>
    </div>
    <div id='sidebar-wrapper'>
    <b:section class='sidebar' id='sidebar' preferred='yes' showaddelement='yes'/>
    </div>
    </div>  
        </body>
    </html>

How to add third party ads in Blogger

This post describes how to add ads in Blogger from Amazon Affiliate Program.
I started blog writing in August 2017. Then I applied for Google Adsense after creating 5 posts in my blog. But that application is rejected due to insufficient content. Again I applied for Adsense after some days. But again application is rejected. Then I searched for an alternative for Adsense and I found that Amazon Affiliate Program is better to use in the beginning of blog writing. I got approval from Amazon Affiliate Program when I have only 7 blog posts and 726 views. Below figures shows status of my blog when I got approval from Amazon.


Follow the below steps to add ads in your blog from Amazon Affiliate Program.
  1. Apply for Amazon Affiliate Program.
  2. Go to Amazon Affiliate Program after getting approval from Amazon. I got approval within 1 day after applying.
  3. Go to Product Linking -> Banners.


  4. Copy the HTML code of any banner from this page. I have selected 728 X 90 banner.


  5. Go to Layout tab in Blogger. Then click Add a gadget button.


  6. Then add an HTML/Javascript gadget.


  7. Then paste the copied HTML code here and save.


  8. Then you can see the ads in your blog.

Don't track your own page views in Blogger

This post gives the technique to avoid counting of your own page views in Blogger. First login to your blog and then go to https://[yourblog].blogspot.in/b/statsCookieManage.


Then tick the check box 'Don't track my views for this blog'. Then go to Status -> Overview to check your page views.


But unfortunately blogger still tracking my pageviews. This issue can be resolved by a small technique. Go to https://[yourblog].blogspot.in/b/statsCookieManage. Then click F12. Then go to console in the newly opened window.


Then copy the below code and paste into the console.

function createCookie(name,value,days) {
    if (days) {
        var date = new Date();
        date.setTime(date.getTime()+(days*24*60*60*1000));
        var expires = "; expires="+date.toGMTString();
    }
    else var expires = "";
    document.cookie = name+"="+value+expires+"; path=/";
}
createCookie("_ns", "2", 999);


Then click enter. Now this code will be executed. Thus tracking of my own page views issue is resolved for me.